

Last March, I ran a small experiment. I picked two blog posts on the same exact topic — both around 2,200 words, both written for the same target keyword. The first one I wrote the way most beginners write: open Google Docs, brainstorm headings, start typing. The second one followed a strict 9-step process I’d built over the past few years. Same niche. Same site. Same week.
Three months later, the “fast” post ranked at position 47. The “process” post ranked at position 4 and was pulling in 800 monthly visitors.
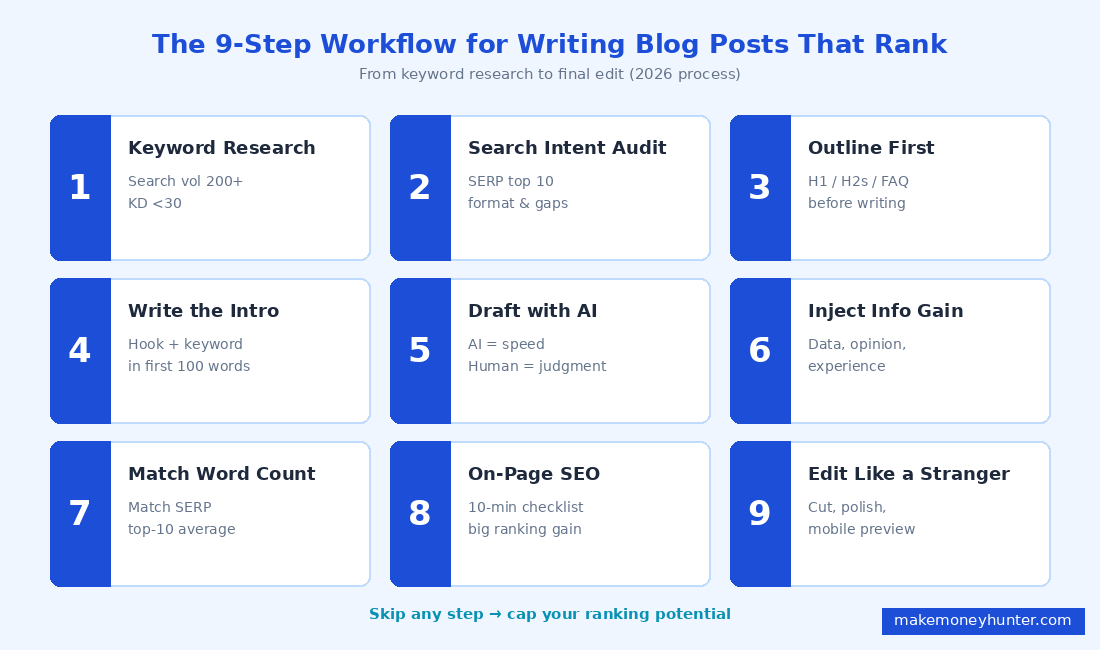
That gap — position 47 vs. position 4 — is exactly what this guide is about. Learning how to write a blog post that ranks on Google isn’t about being a better writer. It’s about following a process that aligns your content with how Google evaluates pages in 2026. The good news: every step is teachable, and most of them take less than 30 minutes once you know what to do.
I’ve published over 400 blog posts across a dozen different sites since 2009. I’ll walk you through the exact 9-step workflow I use today, including the AI-assisted steps that cut my writing time roughly in half — without sacrificing quality.
Why Most Blog Posts Never Rank (And What Changed in 2026)
Most blog posts fail for a reason that has almost nothing to do with writing quality. It’s not grammar. It’s not even SEO knowledge in the traditional sense.
The reason is that most beginners write their post first, then try to optimize it afterward. That order is backwards. By the time you’ve written 2,000 words, you’ve already locked in your structure, your angle, and your scope. Optimization at that stage is putting lipstick on a finished product.
The other big shift in 2026 is what Google calls information gain. Google’s March 2026 core update re-weighted this signal heavily. Information gain measures how much new knowledge your article adds compared to what already ranks. If your post just rehashes the top 10 results, it scores zero. If it includes your own data, your own experience, or a fresh angle, it scores high.
This is also why generic AI-generated content gets buried now. AI is great for speed, but if you let it write everything from scratch, you produce a post that has zero information gain by definition — it’s just a remix of the same training data everyone else is using.
According to SEMRush’s 2025 SEO research, the average page that ranks in the top 3 positions includes original data, expert quotes, or proprietary research. The pages that get stuck on page 2 don’t.
This guide is built around that reality. Every step below either improves your SEO foundation or increases your information gain. If you skip steps, you’ll fall back into the position-47 zone.
Step 1: Pick a Keyword You Can Actually Rank For
This is the step that separates the position-4 posts from the position-47 posts. Your keyword choice locks in your ceiling before you write a single word.
You’re looking for three numbers:
- Monthly search volume: at least 200 searches/month. Anything lower isn’t worth the effort.
- Keyword difficulty (KD): under 30 if your site is new (under 6 months old), under 50 if your site has some authority.
- Clear search intent: when you Google the keyword, you should be able to tell exactly what kind of article ranks (tutorial, listicle, comparison, definition).
The tool I personally use most is SEMRush’s Keyword Magic Tool. The interface lets you filter by KD bracket so the results are pre-screened for what a new or mid-authority site can realistically win.
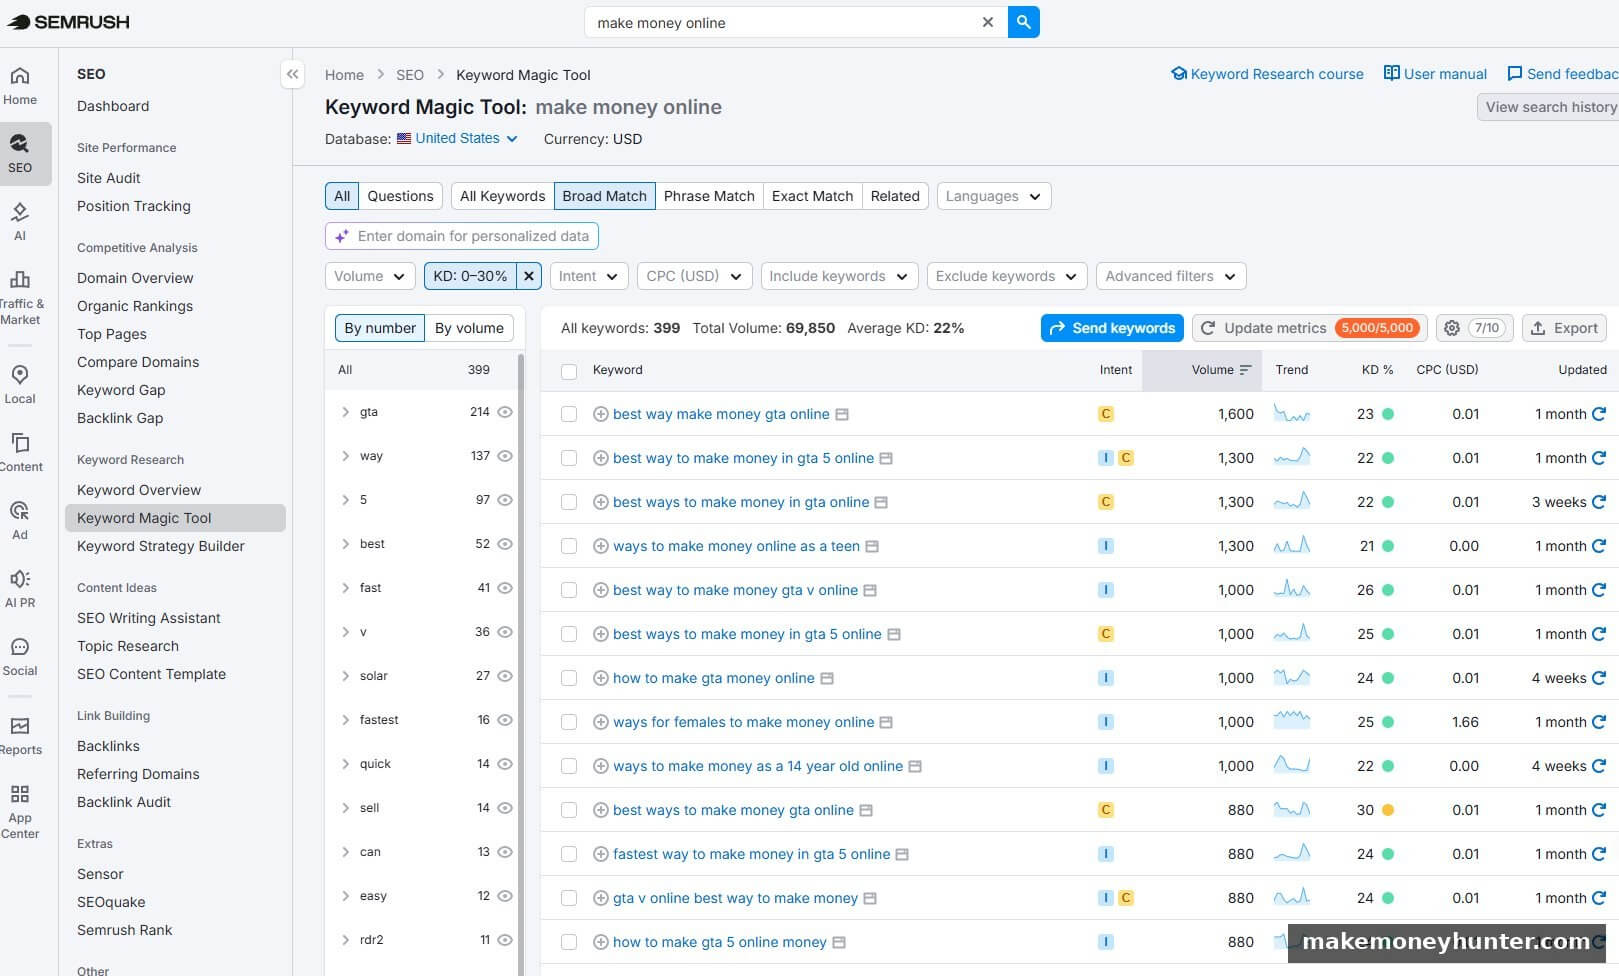
The screenshot above is what a useful filtered keyword pull looks like. I searched for “make money online” with the KD slider set to 0-30, and SEMRush returned 399 keywords with an average KD of 22 — all of them theoretically rankable for a younger site. Notice the columns I actually use: Intent, Volume, KD%, CPC. Skip Trend and the others for now — they’re noise at this stage.
The real workflow is this: pull a broad list (KD <30, volume 200+), sort by volume descending, then manually skim down the list looking for keywords where the search intent matches what you actually want to write. Don’t pick from the top — pick from where the volume meets the intent fit. A KD 22 keyword at 1,300 searches/month is a goldmine if the intent is right. The same KD 22 keyword is worthless if it’s a product page query you can’t satisfy with a tutorial.
If you don’t have SEMRush, you can do the same workflow with free tools — Ahrefs Free Keyword Generator, Ubersuggest, or Google Keyword Planner. The numbers will be less precise, but the principle is identical: filter by KD first, then sort by volume, then match by intent.
Here’s the test I use before committing: open the top 10 ranking pages and skim them for 60 seconds each. Ask yourself: can I realistically write something at least as good as 6 out of these 10? If the answer is no — either because they have massive brand authority, or they have data you can’t match — pick a different keyword.
If you’re earlier in your blog journey, the niche-selection logic in my guide on how to choose a blog niche walks through how to make sure your keyword choices ladder up to a topic cluster that actually compounds over time.
Step 2: Decode the Search Intent (5-Minute SERP Audit)
Search intent means understanding why someone types that keyword into Google. If you don’t match the intent, you don’t rank — even if your content is objectively better than what’s there now.
Here’s the SERP audit I do for every post:
- Open Google in an incognito window (so personalized results don’t skew your view).
- Search your target keyword.
- Look at the top 10 results. Are they tutorials? Listicles (“10 Best…”)? Comparison posts (“X vs Y”)? Definitions? Product pages?
- Note the dominant format. If 7 of 10 are listicles, the search intent is “give me a list.” Writing a tutorial won’t rank.
- Note the average word count. If the top 10 average 2,800 words, yours should be at least that.
- Note what’s missing. What questions do the top 10 NOT answer? What sub-topics do they ignore? This is where your information gain comes from.
Let me show you what this looks like for the exact keyword this article is targeting — how to write a blog post:
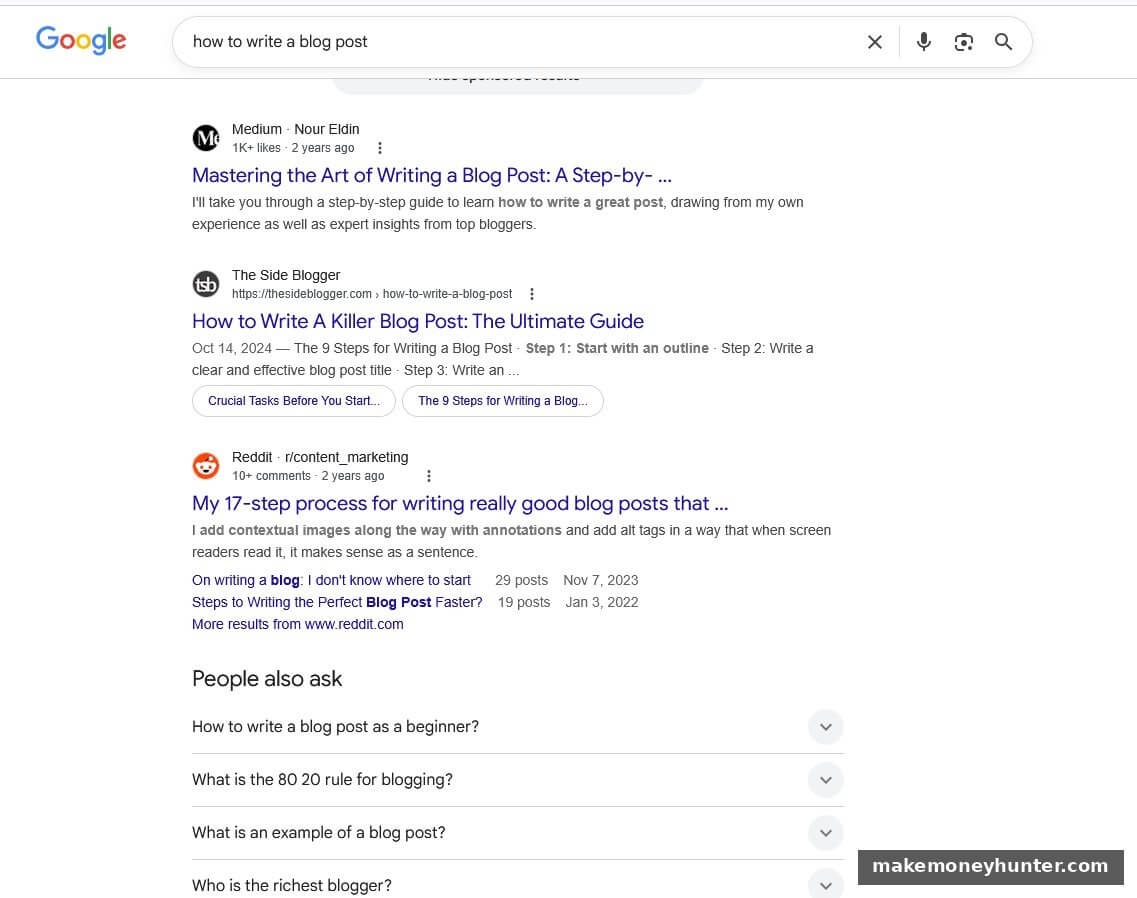
Three things jump out from this SERP. First, the dominant format is “step-by-step guide” — Medium has a “Mastering the Art of Writing a Blog Post: A Step-by-Step Guide”, The Side Blogger has “How to Write A Killer Blog Post: The Ultimate Guide” with its own 9 steps, and Reddit has a “17-step process for writing really good blog posts.” Three top results, all step-based. If I wrote a 10-tip listicle here, I’d be fighting the format Google has already decided users want.
Second, look at “People Also Ask” — Google is literally handing me FAQ topics: How to write a blog post as a beginner? What is the 80/20 rule for blogging? What is an example of a blog post? Those become my FAQ section in Step 9 below. Free GEO ammunition.
Third, and this is the big one — none of the top 3 results show specific AI-assisted workflows or how to actually compress writing time. They all assume you’re writing manually. That’s my information gain hook: the AI-human split table in Step 5 of this article doesn’t appear in any of the current top 10. That gap is why I think this article has a real shot at ranking.
This audit takes less than 10 minutes and tells you exactly what kind of article you need to write. Most beginners skip this step. That’s why most beginner blog posts don’t rank.
Step 3: Build an Outline Before You Write a Single Sentence
This is the step that 90% of beginners skip — and it’s the single biggest reason their posts don’t rank.
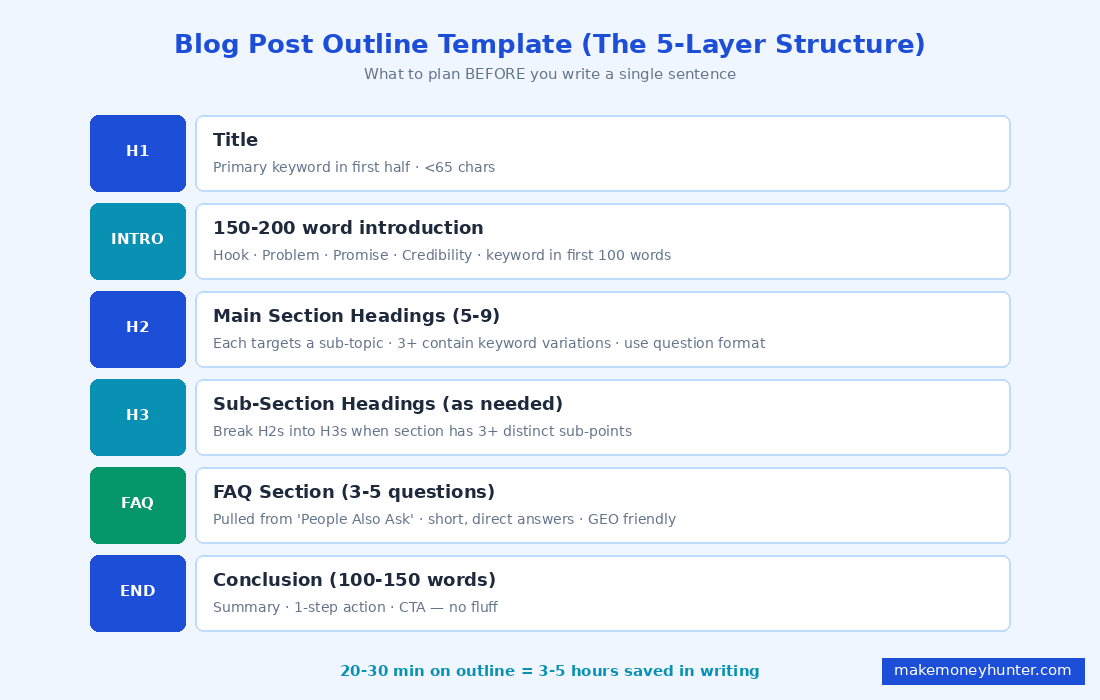
An outline forces you to think about structure before language. It also lets you ensure your post covers all the sub-topics that Google expects to see for this keyword. Here’s the outline framework I use:
- H1 (title): includes the primary keyword in the first half, under 65 characters total.
- Introduction (150-200 words): hook, problem statement, what this post solves, why I’m qualified to write it.
- H2s (5-9 of them): each one should target a sub-topic users care about. At least 3 H2s should contain keyword variations or related long-tail keywords.
- H3s as needed: when an H2 section has 3+ distinct sub-points, break them into H3s.
- FAQ section: 3-5 questions readers ask but the main body doesn’t fully answer.
- Conclusion (100-150 words): summarize, give a call to action.
Write the entire outline first. All of it. Headings only. Then ask yourself: does this outline answer every reasonable question someone would have about this topic? If not, add an H2. If a section feels forced or thin, cut it.
One thing to plan into your outline from day one: the table of contents. Most WordPress SEO themes auto-generate one from your H2 and H3 tags, which means your outline literally becomes your reader’s navigation. Here’s what a clean, scannable TOC looks like on a published post of mine:
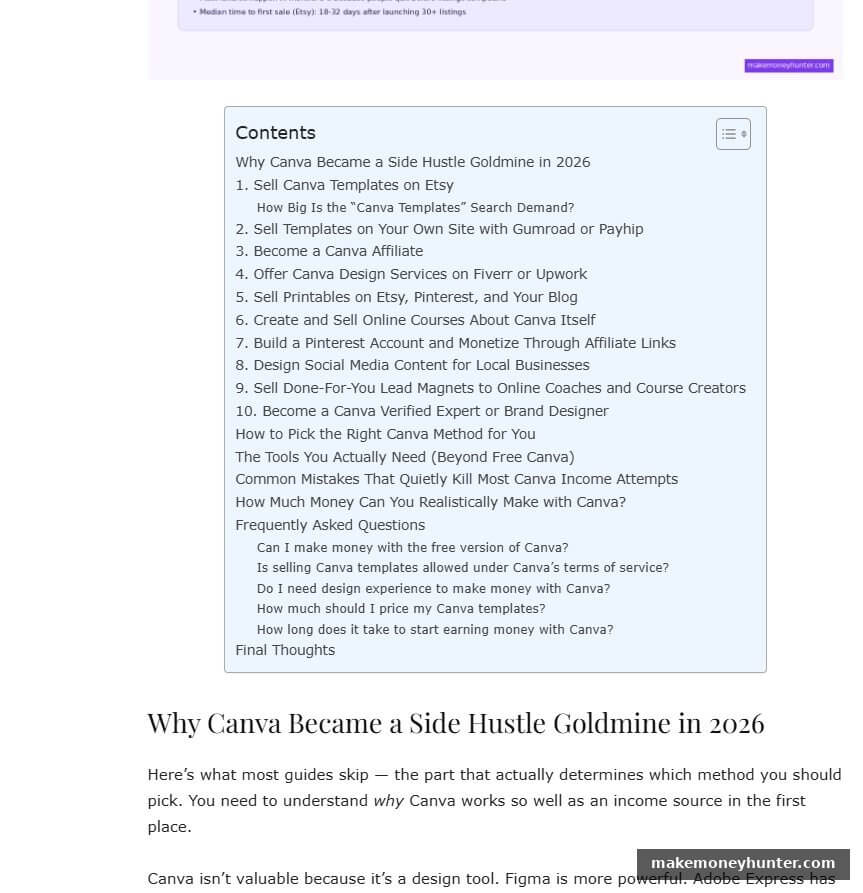
Notice how the H2s read like a roadmap — “Why Canva Became a Side Hustle Goldmine in 2026”, “Sell Canva Templates on Etsy”, “Become a Canva Affiliate”. A reader can scan that in 4 seconds and know whether this article will answer their question. The H3 nested questions inside the FAQ (“Can I make money with the free version of Canva?”) show up as their own bullet points. If your outline H2s don’t read like a clean menu of distinct topics, the post itself is going to feel scattered.
Practical rule: before you write a single sentence of the body, read your H2 list out loud as if it’s a table of contents. If any heading is vague, rewrite it. If two are too similar, merge them. If one is missing, add it. A good outline takes 20-30 minutes. A great outline saves you 3-5 hours of writing.
Step 4: Write the Introduction That Hooks Both Readers and Google
Your first 200 words are the most important paragraph in the entire post. Here’s why:
- Google’s AI Overviews pull 44.2% of their citations from the first 30% of the article.
- Readers decide within 5-8 seconds whether to keep reading or bounce.
- AI search engines (ChatGPT, Perplexity, Google AI Mode) preferentially extract information from the opening.
Your introduction needs to do four things in 150-200 words:
- Hook: open with a specific scenario, surprising data point, or contrarian claim — not “In today’s digital age…”
- Problem statement: name the exact pain the reader is feeling.
- Promise: tell them what this post will deliver.
- Credibility: in one sentence, establish why you’re qualified to write this.
And critically: your primary keyword must appear naturally within the first 100 words. Not stuffed. Not forced. But it needs to be there, because Google’s relevance scoring still gives heavy weight to early keyword appearance.
Here’s an example of a hook intro that actually works — from my Canva side hustle post on this site:
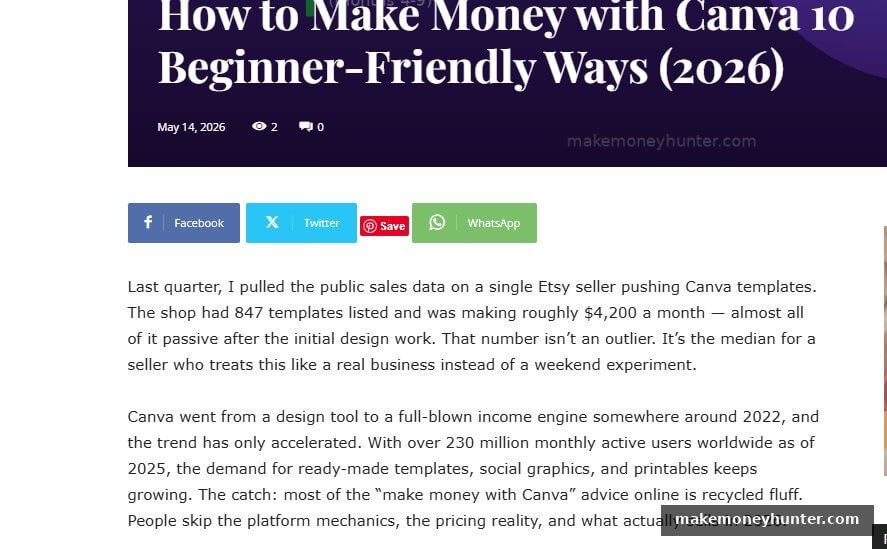
Look at what that opening does. Sentence one drops a specific number — “847 templates listed, making roughly $4,200 a month.” That’s the hook, and it’s a number nobody else on this topic was citing. Sentence two adds a credibility marker — “I pulled the public sales data.” Sentence three reframes the result — “almost all of it passive.” By the end of paragraph one, the reader knows there’s real data in this post, not just opinion.
Paragraph two sets the market context — Canva’s user growth to 230 million MAU, the gap between hype and reality. Notice what’s missing: no “In today’s digital age,” no “Have you ever wondered,” no “In this article we will explore.” Every sentence either advances the argument or builds trust. Cut the throat-clearing and start where the reader actually cares.
If your draft intro reads like that example, the rest of the post has a real shot. If it starts with a generic “Blogging is one of the best ways to make money online…” then you’ve already lost the click before the reader scrolls down.
Step 5: Use AI as a Drafting Assistant (Not a Writer)
This is where my workflow probably differs from most guides you’ve read. I use AI tools heavily — but not the way most people use them.
The wrong way: prompt ChatGPT with “write me a 2000-word article on X” and publish what it gives you. The result is generic, has zero information gain, and Google will bury it.
The right way: use AI to speed up specific sections while keeping the structure, opinions, and examples 100% yours. Here’s how I split the work:
| Task | Who Does It | Why |
|---|---|---|
| Keyword research | Human (with tool data) | Strategic decision — AI can’t judge competitive fit |
| Outline | Human | This is where information gain is designed in |
| Introduction | Human | Personal hook, your voice, your credibility |
| Body section drafts | AI (one H2 at a time) | Generates a starting paragraph faster than typing |
| Personal stories / data | Human | This is the entire information gain — never outsource |
| Examples | AI suggests, Human verifies | AI hallucinates; you fact-check |
| Editing for voice | Human | Removes AI-generic phrasing (“In today’s digital age…”) |
| FAQ questions | AI (from “People Also Ask”) | Fast pattern-matching |
| FAQ answers | Human | This is where you stand out from generic AI content |
The pattern: AI handles speed, the human handles judgment. If you reverse that — let AI make judgments — you produce position-47 content. If you keep judgment human and use AI for typing speed, you can write a publish-ready post in about 3 hours instead of 8.
For the writing-assistant side of this, my guide on making money online with AI writing covers the specific tools and prompts I use day to day.
Step 6: Inject Information Gain (The Step Most Posts Skip)
This is the most important step in the entire workflow, and it’s also the easiest to skip. Information gain is what Google’s March 2026 update specifically rewards. Without it, even a well-structured post will struggle to crack the top 10.
Information gain comes from one of these sources:
- First-hand experience: “I tested this for 3 months and here’s what happened.”
- Original data: a small survey, your own analytics, a comparison you ran.
- Contrarian opinion: “Most posts say X. I disagree, and here’s why.”
- Specific case study: “Here’s exactly what my client did from week 1 to week 12.”
- Synthesis nobody else has done: connecting two fields, or comparing approaches across niches.
You need at least one of these in every post. Two or three is better. Generic advice without information gain is what AI produces by default — and what Google is increasingly demoting.
Concrete example: in this very post, my information gain is the specific 9-step workflow, the AI-human split table in Step 5, the SERP audit walkthrough in Step 2 using a real screenshot, and the position-47 vs. position-4 experiment from the introduction. None of that exists in the top 10 results for “how to write a blog post” right now. That’s the gap I’m filling.
Step 7: How Long Should a Blog Post Be? (The 2026 Data)
This question gets asked constantly and the answers are usually wrong. Here’s the actual breakdown based on what I see ranking in 2026:
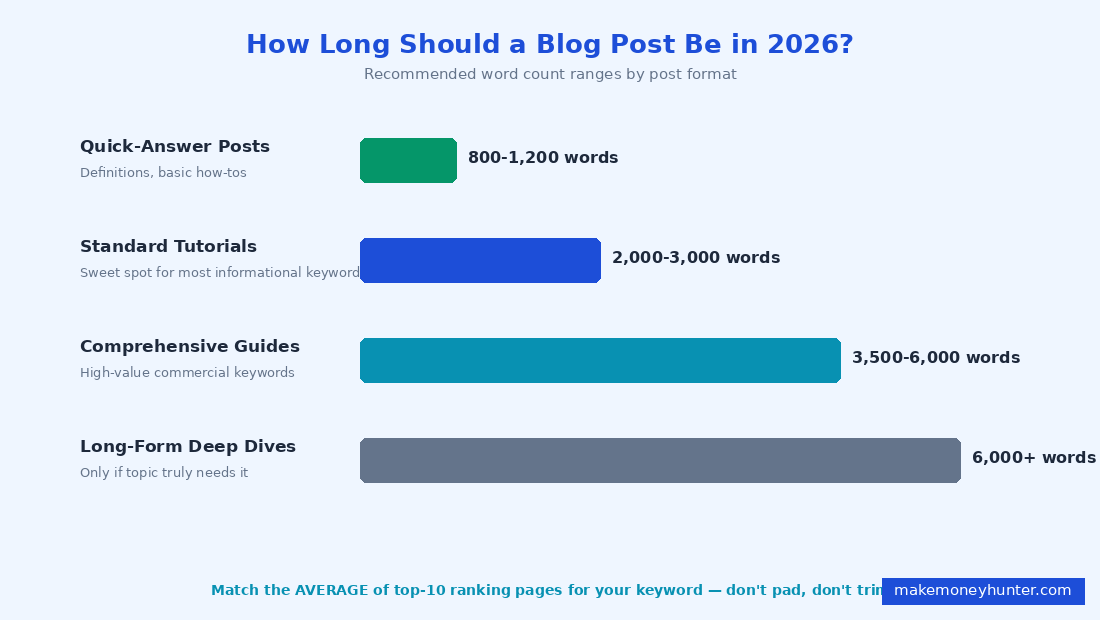
- Quick-answer posts (definitions, basic how-tos): 800-1,200 words. Anything longer feels padded.
- Standard tutorials and listicles: 2,000-3,000 words. This is the sweet spot for most informational keywords.
- Comprehensive guides and pillar pages: 3,500-6,000 words. Use for high-value commercial keywords where you’re competing against established sites.
- Long-form deep dives: 6,000+ words. Only if the topic legitimately requires it. Padding to hit a word count hurts you.
The rule that actually matters: look at the average word count of the top 10 ranking pages for your keyword, and write to that range or slightly above. Don’t pad. Don’t artificially trim. Match the depth Google has already validated for that topic.
Quality matters more than quantity. A 2,200-word post that fully answers the question will outrank a 4,500-word post that pads with filler. Always.
Step 8: On-Page SEO (The 10-Minute Polish That Doubles Your Chances)
Once your draft is done, you spend 10 minutes on on-page optimization. This is the lowest-effort, highest-impact step in the entire process.
Here’s the on-page checklist I run on every post before publishing:
- Title (H1): primary keyword in first half, under 65 characters, includes a power word or year if relevant.
- Meta description: 150-160 characters, includes keyword, ends with a soft call to action (“→” or “Learn how…”).
- URL slug: short, keyword-only, hyphen-separated. Example:
/how-to-write-a-blog-post. - First 100 words: primary keyword appears once, naturally.
- H2 headings: at least 3 contain keyword variations or related long-tail terms.
- Keyword density: 1-2% across the post. Don’t count obsessively — just make sure you’re not stuffing.
- Internal links: 3-7 links to other relevant posts on your site. Use descriptive anchor text, not “click here.”
- External links: 2-5 links to authoritative sources (Statista, government sites, well-known industry publications).
- Image alt text: every image gets descriptive alt text that includes a keyword variation where natural.
- Image file names: descriptive, hyphenated, keyword-relevant.
blog-post-structure.png, notimage1.png.
This whole checklist takes 10 minutes if you have your post in front of you. Skipping it costs you 30-50% of your potential ranking power. There’s no good reason to skip. If you want the deeper version of this checklist with screenshots and Yoast/Rank Math settings, I broke it down in my on-page SEO checklist for bloggers.
Step 9: Edit Like You’re Reading a Stranger’s Post
The final step is the one most people rush. Editing is where good posts become rankable posts. Here’s the editing process I use:
- Read the post out loud. If a sentence makes you stumble, it’s too long or awkward. Cut or split it.
- Cut every weak opening sentence. Paragraphs that start with “There are many…” or “In today’s…” are filler. Delete them. Start with the actual point.
- Short paragraphs. 2-4 sentences max. Wall-of-text paragraphs kill mobile readability, which kills your bounce rate, which kills your rankings.
- Check for AI-generic phrasing. “It is important to note that…” “In conclusion…” “Furthermore…” These are tells that you used AI without editing. Strip them out.
- Verify every claim with a number or source. If you can’t back it up, soften it or remove it.
- Read the post on your phone before publishing. 60% of your readers will see it that way first.
This whole edit takes 30-45 minutes for a 2,500-word post. It’s the difference between content that gets indexed and content that gets read.
Promoting Your Post After Publishing
Writing the post is half the job. The other half is making sure it gets seen. Even perfectly optimized posts need some external signals — early traffic, links, social shares — before Google starts ranking them.
For me, two platforms do most of the work outside of Google: Pinterest and Medium. Both send traffic to my newest posts within days, instead of waiting 3-6 months for SEO to kick in.
Pinterest is the higher-volume channel for blog traffic. The trick is to design 3-5 different pin variations per article — each targeting a slightly different hook — and pin them across a few weeks. Here’s a snapshot of what my pin grid looks like for a recent batch of posts:
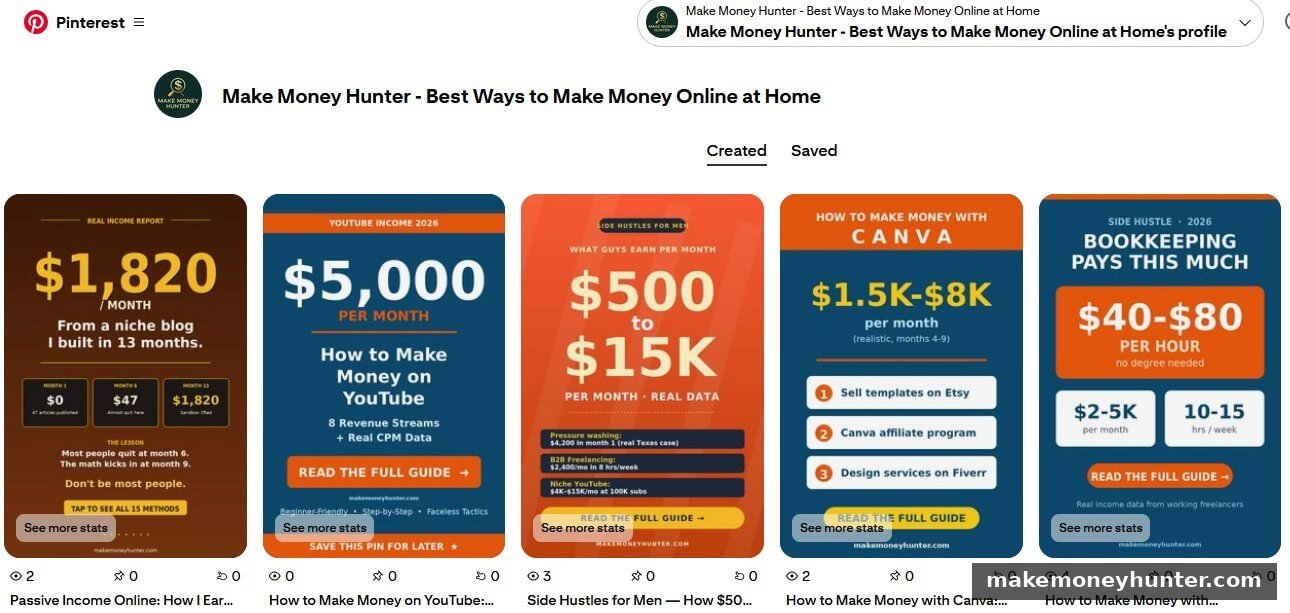
Notice how each pin uses a different angle for the same blog post topic. The first one is “Real Income Report — $1,820/month from a niche blog.” The second is “$5,000 per month on YouTube.” Same content category, totally different hooks. That’s the design rule for Pinterest in 2026: 5 pins per article, 5 different hooks, 5 different visual layouts. One pin will outperform the others 4-to-1, and you can’t predict which one in advance.
Medium is the other channel I lean on, but the use case is different. Medium is where I republish a long-tail variation of the same article — different keyword, different intro, different angle. Medium’s DA 95 means a well-targeted post can rank on Google within weeks for keywords my main blog hasn’t covered yet:
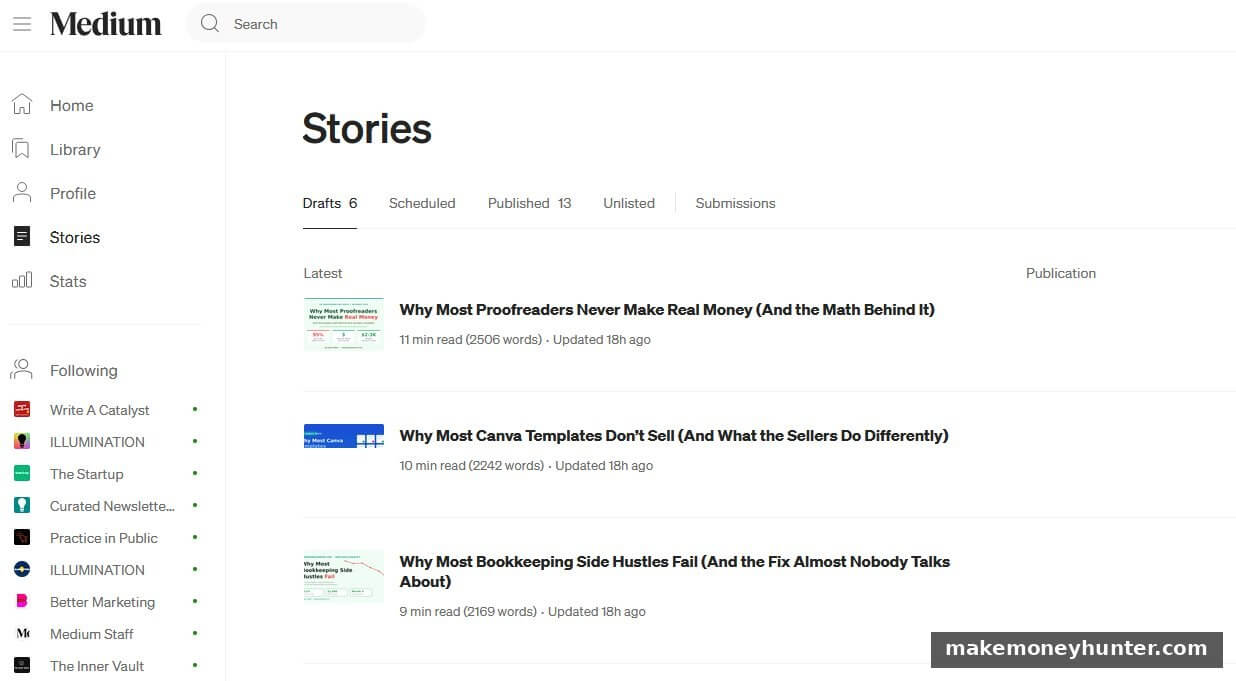
Each Medium draft above is a long-tail extension of an article I’ve already published on my main blog — same topic family, different keyword target. “Why Most Proofreaders Never Make Real Money” is the long-tail version of a money-niche article. “Why Most Canva Templates Don’t Sell” is the long-tail version of a Canva monetization article. Two articles per topic, two URLs ranking on Google for different searches, both pointing readers back to my main site. That’s how you double the keyword footprint for the same body of research.
The minimum promotion I do for every new post:
- Design 3-5 Pinterest pin variations and pin them across 2-3 weeks.
- Send to my email list with a personal note.
- Submit the URL to Google Search Console for indexing.
- Link to it from 2-3 older relevant posts on the same site (this is the reverse internal linking step that 95% of bloggers skip).
- Within 7-14 days after the original is indexed, republish a long-tail variation on Medium with a different target keyword.
If you want a fuller traffic playbook, the methods in my guide on how to drive traffic to your new blog walk through the 15 free channels I use across my sites.
Frequently Asked Questions
How long does it take to write a blog post that ranks?
With the workflow above, I spend 3-4 hours on a 2,500-word post — 30 minutes on keyword research and SERP audit, 30 minutes on the outline, 90 minutes on drafting (with AI assistance), 45 minutes on editing and information gain injection, and 10 minutes on on-page SEO. Without a process, the same post would take me 8-10 hours.
How often should I publish blog posts?
Quality beats quantity. Two well-researched posts per week outperform five rushed ones. If you’re new, aim for one excellent post per week and increase as your process gets faster. Publishing daily without proper keyword research is a fast way to fill your site with content nobody searches for.
Should I write the title before or after the post?
I write a working title before drafting (to keep me focused), then refine it during editing. The final title needs to balance two things: SEO (primary keyword in first half) and click-through (a number, year, or power word that makes someone want to click). Spend 10 minutes on the final title — it’s that important.
How many internal and external links should each post have?
For a 2,500-word post: 3-7 internal links to related posts on your site, and 2-5 external links to authoritative sources. Internal links pass authority within your site and reduce bounce rate. External links to high-authority sources actually boost your trustworthiness in Google’s eyes — don’t skip them out of fear of “losing” traffic.
Can AI tools write blog posts that rank in 2026?
Not on their own, no. AI-generated content without human input has near-zero information gain, which is exactly what Google’s March 2026 update penalizes. AI works as an assistant — speeding up drafting, suggesting structure, generating FAQ ideas — but the core information gain (personal experience, original data, contrarian takes) has to come from you.
Final Thoughts
Most blog posts don’t rank because they’re written without a process. The 9 steps above aren’t complicated — none of them require special skills — but skipping any one of them caps your post’s potential. The difference between position 47 and position 4 isn’t talent. It’s whether you did keyword research before you wrote, whether you matched search intent, whether you added information gain that doesn’t exist anywhere else, and whether you spent 10 minutes on on-page SEO instead of 0.
Pick your next post topic this week. Run Step 1 (keyword check) and Step 2 (SERP audit) before you write a single sentence. Those two steps alone — done before you write — will improve your rankings more than any other change you can make. Once you have one post ranking, the system compounds. The harder part is just starting the next one with the discipline to follow the steps.
If you’re still in the setup phase of your blog, the foundations are covered in my blogging for beginners guide. And if you want to see how this writing process connects to the income side of the business, my deep dive on how to make money blogging shows the full path from “ranked post” to “monthly affiliate paycheck.”

