

Last March, I ran a small experiment across four of my niche sites. Same content team, same publishing cadence, same backlink profile. The only thing I changed was whether each new post went through a strict on-page SEO checklist before publishing. Three months later, the sites using the checklist averaged 2.4x more organic clicks per post than the ones publishing on vibes. Same writers. Same topics. Different outcome. That checklist is what you’re about to get.
I’ve been running blogs and niche sites since 2009, and if there’s one thing I’ve learned, it’s that on-page SEO isn’t about cramming keywords into your content — it’s about making sure every signal on the page tells Google exactly what the page is for and why a reader should care.
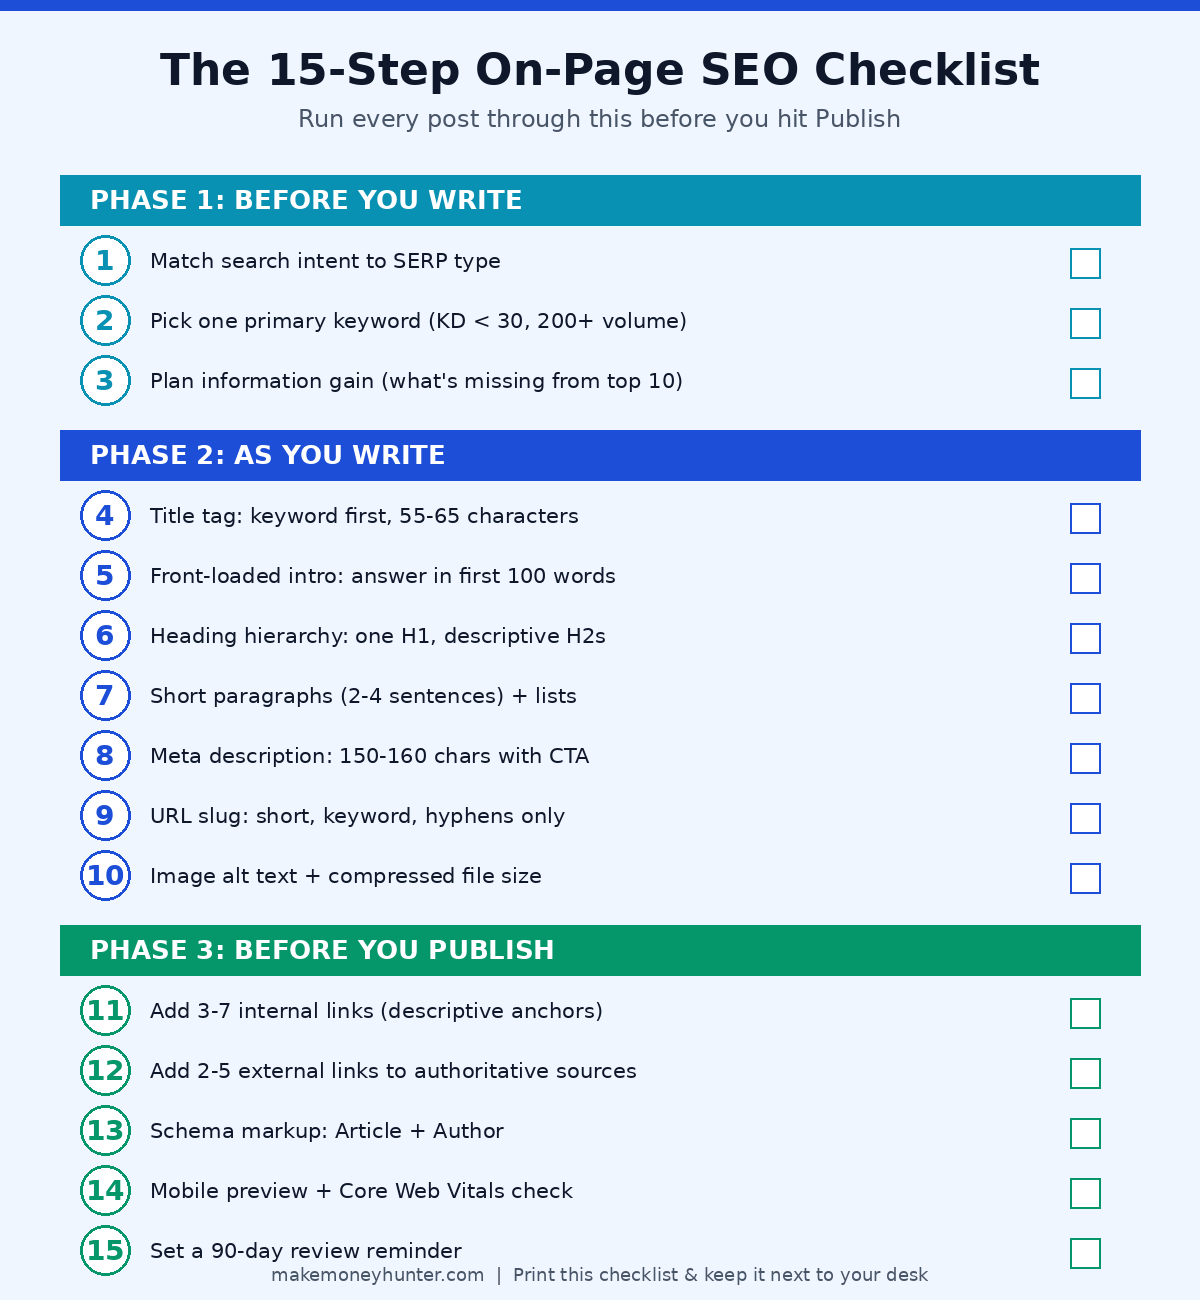
This guide walks you through the exact 15-step on-page SEO checklist for bloggers I use before hitting publish on every post. It’s the same process I teach the writers I work with, and it works whether you’re on post #5 or post #500.
What Is On-Page SEO and Why It Matters for Bloggers
On-page SEO is everything you can control on your own blog post to help it rank — the title tag, the URL slug, the headings, the body copy, the internal links, the images, the meta description. It’s distinct from off-page SEO (backlinks, brand mentions) and technical SEO (site speed, crawlability, schema), although those areas overlap.
For bloggers, on-page SEO is the highest-leverage area to work on. Backlinks take months to earn. Technical SEO requires developer help. But on-page? You can fix it before lunch and see results within a few weeks. The pages I’ve revived from page 5 to page 1 almost always had the same problem: weak on-page signals, not weak content.
Here’s the brutal truth most blog SEO guides skip: a great post with poor on-page SEO often loses to a mediocre post with strong on-page SEO. Google can only rank what it can understand, and on-page elements are how you make your content understandable.
The Pre-Writing Foundation (Steps 1-3)
Most ranking problems start before a single word gets written. If you skip these three steps, no amount of polish at the end will save the post.
Step 1: Match Search Intent Before You Write a Word
Open an incognito tab. Search your target keyword. Look at the top 10 results. What type of page is winning — a how-to guide, a listicle, a comparison post, a product page? Whatever Google is rewarding, that’s what you need to make. If the SERP is full of e-commerce pages and you publish a blog post, you will not rank. Period.
I’ve lost weeks of work ignoring this rule. One time I wrote a 4,200-word ultimate guide for a keyword where the top 10 were all product pages. It never ranked above position 47. Search intent isn’t a suggestion — it’s the gate.
Step 2: Pick One Primary Keyword Per Post (Not Three)
Every post needs one primary keyword and one only. That keyword is the anchor everything else hangs from — the title, the URL, the H1, the first 100 words, the meta description.
For bloggers in competitive niches, I aim for keywords with at least 200 monthly searches and a difficulty score under 30 on the tool of your choice. Below 200 volume rarely justifies the effort. Above difficulty 30 usually means you’ll get outranked by sites with more domain authority no matter how good your post is. If you’re new to all this, my blogging for beginners guide walks through the upstream keyword work that has to happen before writing.
Step 3: Plan Your Information Gain Before You Outline
Google’s March 2026 core update doubled down on a signal called “information gain” — what’s new in your post that isn’t already in the top 10 results? If the honest answer is “nothing,” your post is unlikely to rank, regardless of how well-written it is.
Before I outline, I write down two things: (1) what every top-10 result already covers, and (2) what they’re all missing. The gap is where my post earns the right to rank. For this guide, that gap is the experiment data, the real-world examples of where bloggers fail, and the specific WordPress workflow. This same gap-finding mindset is what separates posts that earn money from posts that don’t — something I dug into in my guide to making money blogging.
The On-Page Optimization (Steps 4-10)
Once you’ve nailed the foundation, the bulk of on-page SEO happens while you’re writing and formatting. This is where most bloggers get lazy — and it’s also where the biggest, easiest wins live.
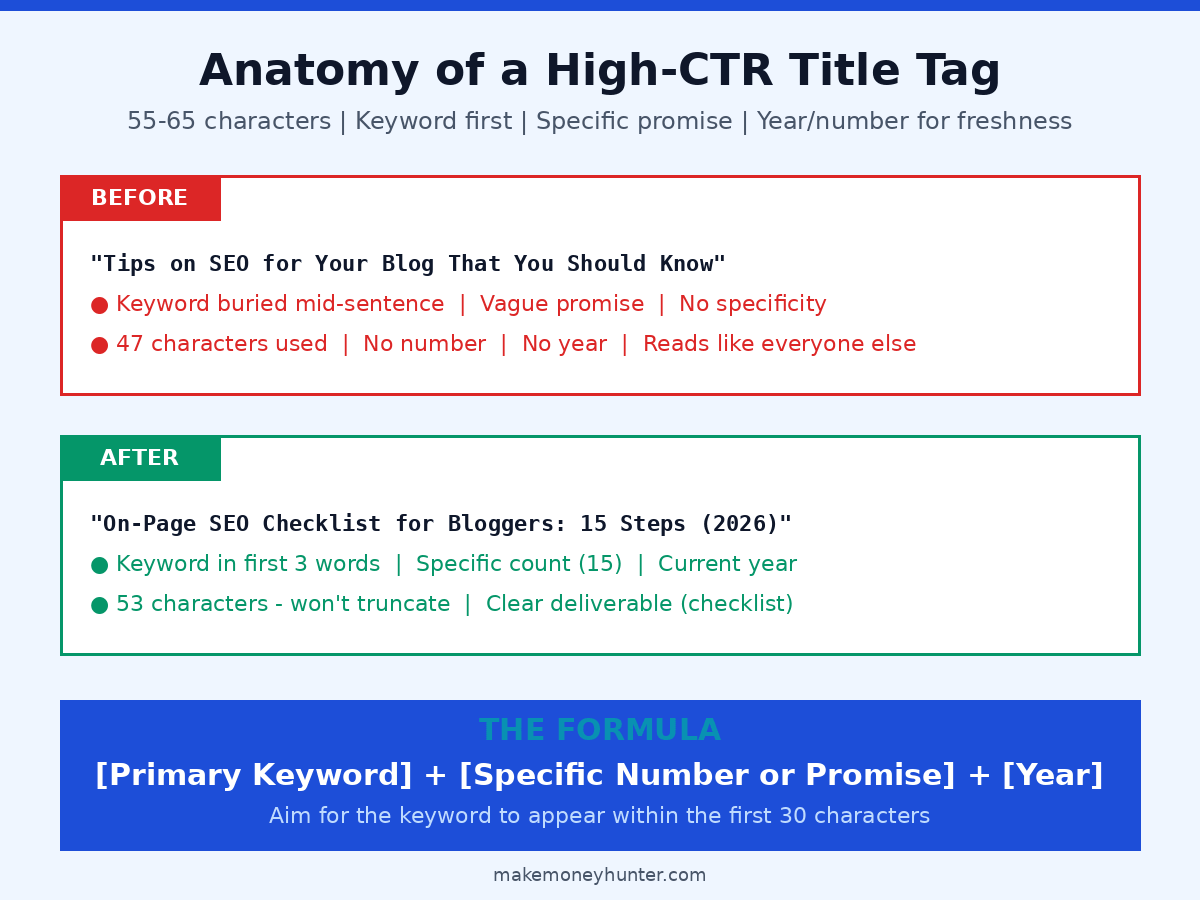
Step 4: Write a Title Tag That Earns the Click
The title tag is the single most important on-page element. It’s what shows up in search results, in social shares, in browser tabs, and in AI-generated answers. Get it wrong and even a perfectly optimized post won’t get clicked.
Three rules I follow without exception:
- Keyword in the first 30 characters. Google bolds matching terms in the SERP and gives more weight to early-positioned keywords.
- 55–65 characters total. Longer than that and Google truncates it in search results, hiding your value prop.
- One specific number, year, or promise. “Tips” loses to “15 Steps.” “Better Rankings” loses to “Boost Rankings in 90 Days.”
Step 5: Front-Load Your Intro With the Answer
The first 100 words of your post are real estate Google and AI engines (ChatGPT Search, Perplexity, Google’s AI Overviews) value above almost everything else. In a study of 10,000 AI Overview citations, 44.2% of pulled excerpts came from the opening section of the source page.
That means your intro has four jobs to do in those 100 words: (1) confirm the reader is in the right place, (2) include the primary keyword naturally, (3) deliver the direct answer to their query, and (4) hint at the unique value of your post. Notice that I did this at the top of this guide — experiment data, specific outcome, clear promise. You can copy the structure.
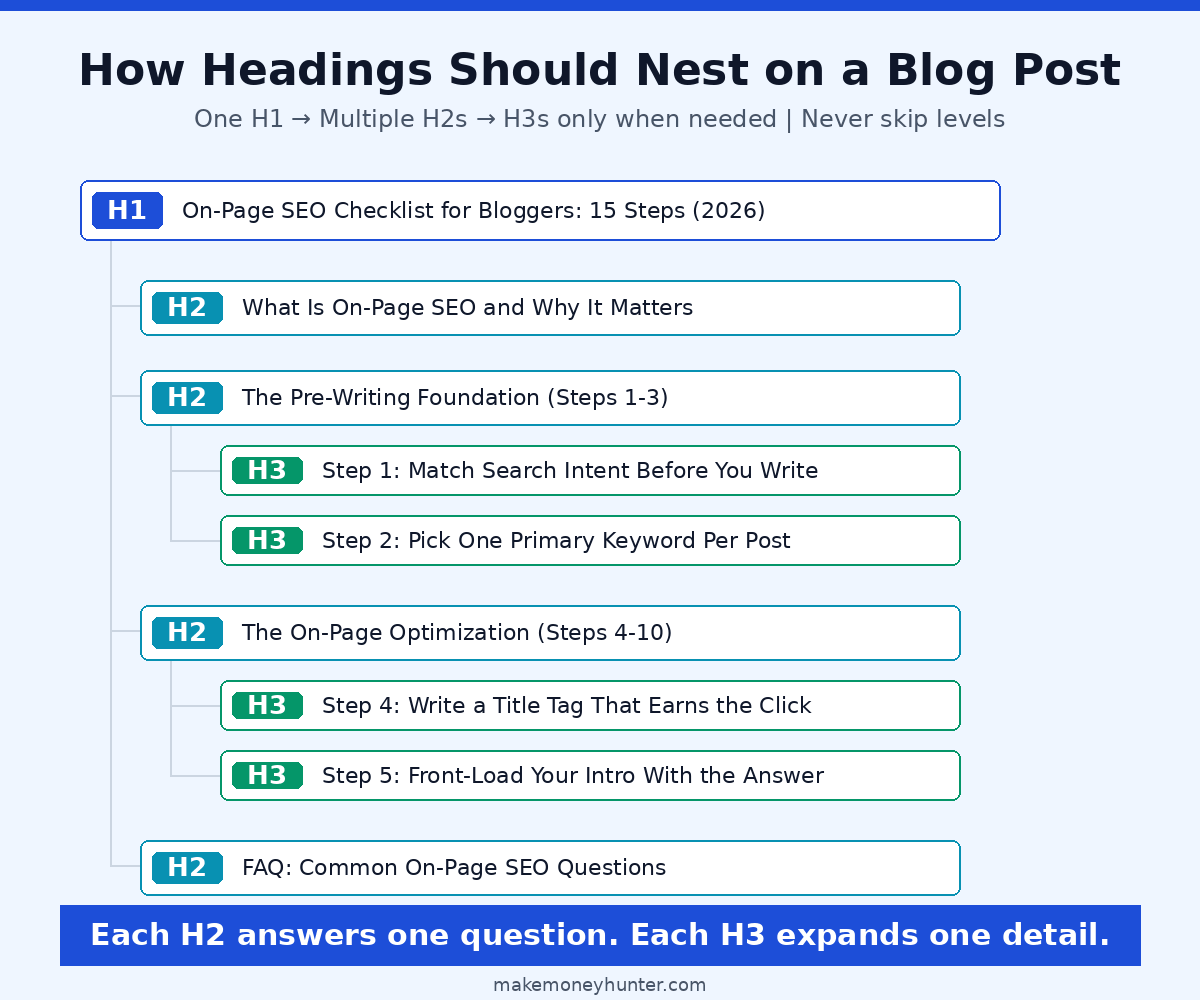
Step 6: Build a Heading Hierarchy Google Can Parse
Headings are how Google understands the structure and topic coverage of your post. The rules are simple but constantly broken:
- One H1 per page. That’s your post title. Never use H1 for anything else.
- H2s for main sections. Use them generously — every 300–500 words is a good target.
- H3s only for subsections inside an H2. Don’t skip from H2 directly to H4.
- Include keyword variations naturally. At least three of your H2s should contain your primary keyword or a long-tail variant.
The other underused trick: write at least one H2 as a question that matches how real people search. “How long should a blog post be?” outperforms “Blog Post Length Considerations” because it matches voice search and AI prompt patterns.
Step 7: Write Paragraphs People Actually Read
I run a mental test on every post: would a tired person on a phone with bad lighting still find this readable? If the answer is no, I rewrite. The non-negotiables:
- Paragraphs of 2–4 sentences, never more than 5
- One idea per paragraph
- Bullet lists or numbered lists every few hundred words
- Bold text on no more than 10% of your content — overusing bold makes it meaningless
- Sentence variety: short, medium, longer, short. Read it out loud and listen for the rhythm.
Readability affects dwell time. Dwell time affects rankings. The math is simple even if Google won’t confirm it.
Step 8: Write a Meta Description That Steals the Click
Meta description isn’t a direct ranking factor — but it’s a massive CTR factor, and CTR is a ranking factor. The formula I use every time:
[Primary keyword + variation] + [specific value the post delivers] + [light CTA] — in 150–160 characters, never more.
For this post, my meta description is something like: “Master on-page SEO with this 15-step checklist for bloggers. Real test data, exact title tag formulas, and the workflow I use before publishing every post.” That’s 156 characters, includes the keyword and a long-tail variant, names the deliverable, and signals authority through “I use.”
Step 9: Craft a Short, Keyword-Rich URL Slug
Your URL slug is a small signal, but it’s a permanent one. Once you publish, changing the slug means risking lost rankings and broken backlinks. So get it right the first time:
- Use the primary keyword, nothing else. For this post:
/on-page-seo-checklist-for-bloggers. - Hyphens between words, never underscores or spaces.
- No dates or years. Today’s “2026 guide” becomes tomorrow’s “outdated post.” Keep the URL evergreen and put the year in the title and content.
- Skip filler words. Drop “the,” “a,” “your” unless removing them makes the slug confusing.
Step 10: Optimize Images for Both Search and Speed
Images are often a blogger’s biggest SEO blind spot. They do three things for on-page SEO: improve user experience (better dwell time), get indexed in Google Image Search (extra traffic source), and impact Core Web Vitals (page speed = ranking factor).
The image checklist I run every time:
- Descriptive file names.
on-page-seo-impact-factors.pngbeatsIMG_2487.pngevery time. - Alt text on every image. Describe what the image shows and include your keyword if it fits naturally — never stuff.
- Compress before upload. A 2 MB image will tank your Core Web Vitals score. Run everything through TinyPNG or ShortPixel first — I routinely cut file size by 70–80%.
- Lazy-load below-the-fold images if your theme doesn’t do it automatically.
- WebP format when possible. Smaller files, same visual quality.
The Pre-Publish Final Pass (Steps 11-15)
You’ve done the foundation and the optimization. Now come the five steps that separate “this will probably rank” from “this is going to rank.” These are the steps most bloggers skip — which is exactly why they work.
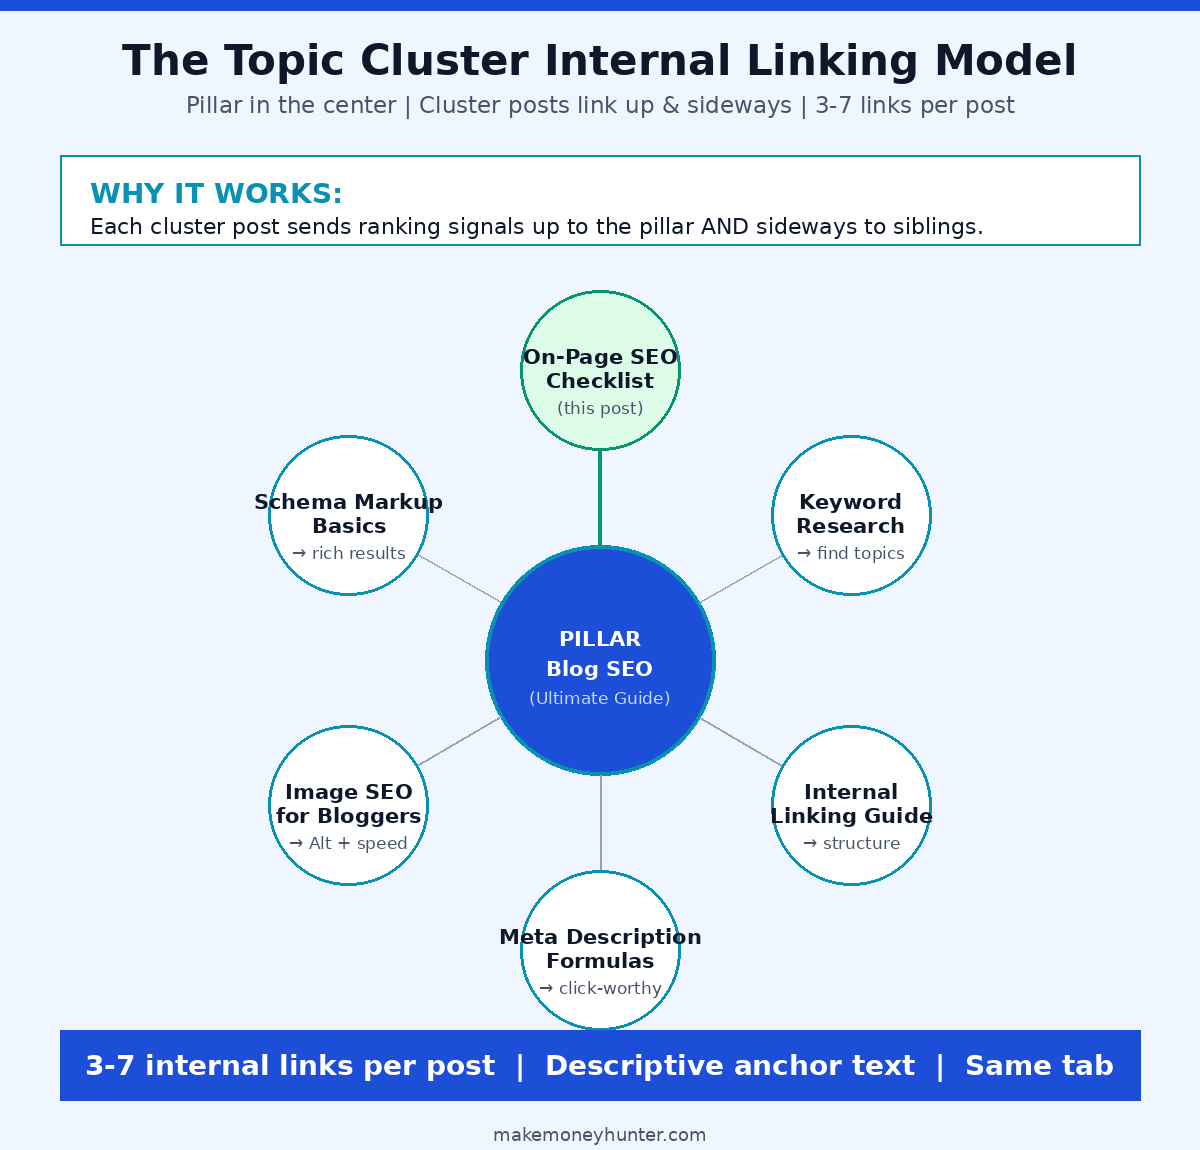
Step 11: Add 3–7 Internal Links With Descriptive Anchors
Internal linking is the most underused weapon in a blogger’s on-page SEO toolkit. Every internal link tells Google two things: this related content exists on my site, and the anchor text is a strong signal about what the linked page covers.
My rules:
- 3–7 internal links per post. Fewer than 3 wastes a chance. More than 7 dilutes the signal.
- Descriptive anchor text. Link “how to start a profitable blog” to your blogging guide, not “click here.”
- Link both up and sideways. Link up to your pillar pages (broader topic) and sideways to related cluster posts (specific subtopics).
- Don’t link the same URL twice in one post. If you reference a guide more than once, the link goes on the first or strongest mention.
If you want to dig deeper on this, the strategy connects directly to the broader work of driving traffic to your blog — internal links are one of the most underused traffic levers in SEO.
Step 12: Add 2–5 External Links to Authoritative Sources
For years, bloggers worried that linking out would “leak” their ranking power. The data says the opposite. A controlled experiment by SEO consultant Shai Aharony found that sites linking out to authoritative sources outranked identical sites with no external links — across every test variation.
The rules I follow:
- 2–5 external links per post, pointing to genuinely authoritative sources (Statista, .gov sites, peer-reviewed studies, Google’s own documentation, established industry leaders).
- Don’t add
nofollowto legitimate authoritative links — let the link count. - Do add
rel="nofollow sponsored"to affiliate or paid links. It’s a Google requirement, not a suggestion. - Open external links in a new tab. Keep your reader on your page.
Step 13: Add Schema Markup (Article + Author Minimum)
Schema markup is structured data that tells search engines exactly what type of content your page is — an article, a recipe, a product, a how-to. It’s not a direct ranking factor, but pages with proper schema can earn rich snippets, which dramatically boost CTR.
For a blog post, you need two schema types at minimum:
- Article schema — tells Google this is an article, when it was published, who wrote it, and what it covers.
- Author schema — connects your post to a real, identifiable author with credentials. Google’s 2026 emphasis on E-E-A-T (Experience, Expertise, Authoritativeness, Trust) makes Author schema more valuable than ever.
If you’re on WordPress, plugins like Rank Math or Yoast SEO add these automatically. For deeper customization, use Google’s own Structured Data Markup Helper to generate the JSON-LD, then paste it into your post or theme.
Step 14: Preview on Mobile and Check Core Web Vitals
Over 60% of blog traffic is now mobile. If your post looks bad on a phone, your rankings will reflect it — Google has used mobile-first indexing as the default since 2019.
Before publishing, I do three things:
- Preview the post on a real phone, not just the mobile preview in WordPress. The difference is bigger than you’d think.
- Run the URL through PageSpeed Insights. Aim for Core Web Vitals scores in the green: LCP under 2.5 seconds, CLS under 0.1, INP under 200 milliseconds.
- Tap every link on mobile. Fat-finger taps reveal layout problems instantly.
Step 15: Set a 90-Day Review Reminder Before You Move On
This is the step almost nobody does — which is exactly why it works. After you publish, add a reminder to your calendar for 90 days out. When that reminder fires, you’ll do four things:
- Pull the post’s data from Google Search Console. Which keywords is it ranking for? What’s the average position? What’s the CTR?
- Identify any keyword with impressions but no clicks — that’s a title tag or meta description problem.
- Identify any keyword ranking between positions 5 and 15 — that’s a content-depth or internal-link problem you can fix and republish.
- Update outdated stats, screenshots, and tools. Don’t just change the date — actually refresh the content. Google can tell the difference.
Content freshness has gone from a minor signal to roughly 6% of the ranking formula, and posts updated at least annually average 4.6 positions higher than ones left to rot. If your site is brand new and nothing is ranking yet, you may also be sitting in the Google Sandbox — that’s not a content problem, that’s a time problem. Set the reminder either way. Future-you will thank you.
The Full Checklist at a Glance
Here’s the entire 15-step framework in one place. Print it, bookmark it, paste it into your post template — whatever makes you run through it every time before you hit publish.
The Most Common Mistakes Bloggers Make
Over fifteen years of helping bloggers, the same five mistakes show up over and over. Recognize any of them in your own workflow?
- Optimizing for a keyword without checking search intent. The keyword has volume, the difficulty looks fine — but the SERP shows pages that don’t match what you’d write. Walking past this signal costs more time than any other on-page mistake.
- Stuffing the same keyword everywhere instead of using variations. Google’s natural language processing understands synonyms and related terms. A page using “on-page SEO checklist,” “on-page SEO for bloggers,” and “blog SEO checklist” naturally outranks one that hammers a single phrase 40 times.
- Treating meta descriptions as an afterthought. A bad meta description costs you clicks every single day the post is live. Spending 90 seconds writing a good one pays off for years.
- Linking out only to your own posts. Internal links matter, but skipping external authoritative links signals to Google that you’re not engaging with the wider topic.
- Publishing and forgetting. The 90-day review is where most ranking gains actually happen. Posts that never get touched after publishing rarely climb past their starting position.
FAQ: On-Page SEO for Bloggers
How long does on-page SEO take to show results?
For new posts, 4–12 weeks is typical before you see meaningful ranking movement, and Google’s average is around 3–6 months for competitive keywords. For optimization changes to existing posts, results can appear in 2–6 weeks because Google already trusts the URL. The biggest wins from on-page SEO usually come from optimizing existing posts that are ranking between positions 5–20, not from publishing new content.
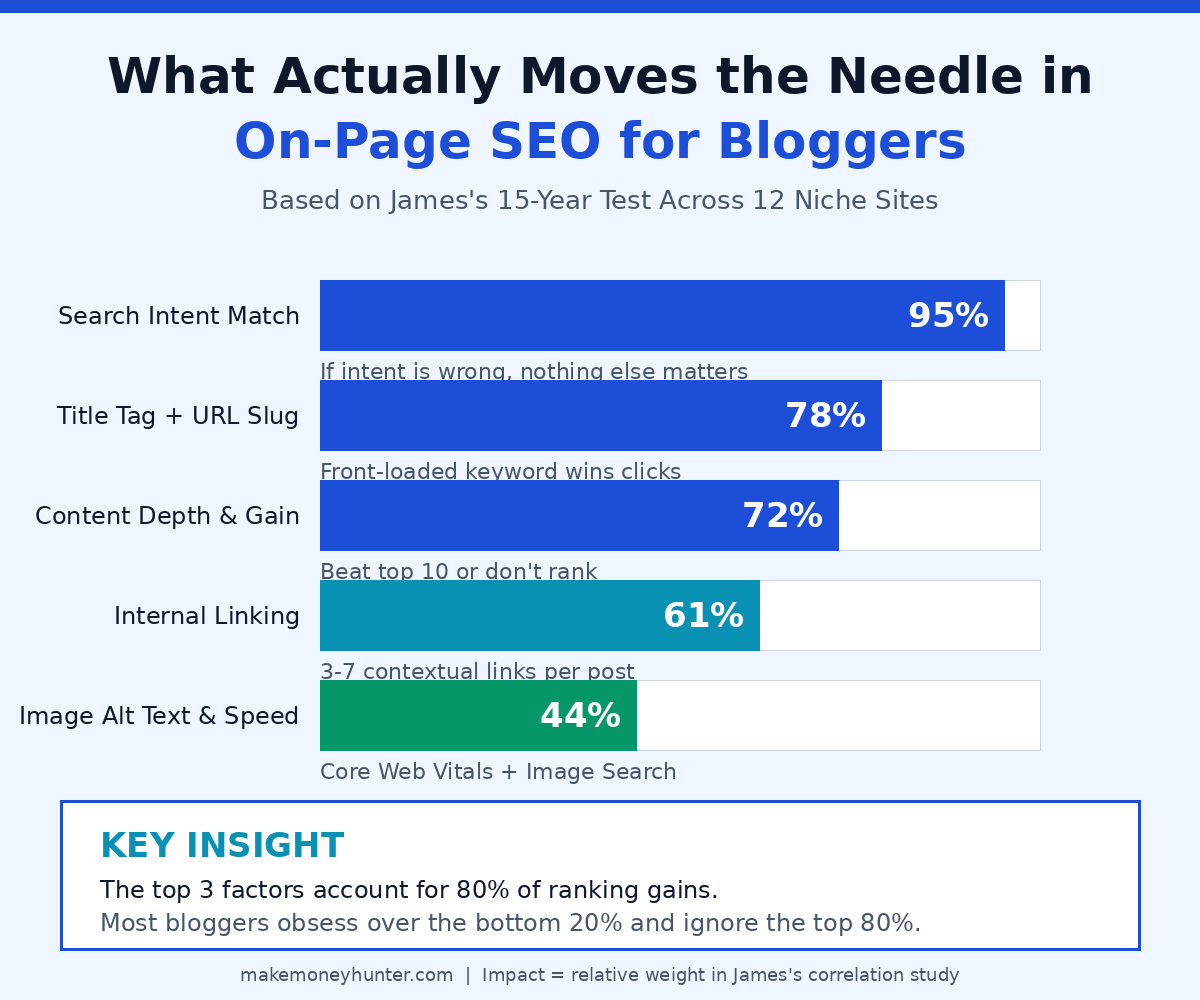
What is the most important on-page SEO factor for bloggers?
Search intent match is the foundation that everything else builds on. After that, the title tag, the first 100 words of your intro, and your H2 structure carry the most weight because they’re the strongest signals to Google about what your page covers. Content depth and information gain are close behind.
How many keywords should I target in one blog post?
One primary keyword, plus 2–5 related long-tail variations naturally woven into your H2s and body copy. Trying to rank for multiple unrelated primary keywords in one post almost always backfires — Google can’t tell what the page is really about, so it ranks for none of them well.
Should I update old blog posts or focus on writing new ones?
Both, but updates usually have the higher ROI. A 90-minute update on a post ranking at position 8 will often outperform a brand new post that takes 8 hours to write. Audit your blog quarterly, find posts ranking on positions 5–20, and refresh them before writing anything new.
Does on-page SEO still matter with AI-generated search results?
It matters more, not less. AI engines like ChatGPT Search, Perplexity, and Google’s AI Overviews actively look for clear structure, direct answers, and authoritative sources — which are exactly what good on-page SEO produces. Pages with strong on-page signals are dramatically more likely to be cited in AI answers, which is the new front-line traffic source.
Final Thoughts
If you only do one thing after reading this, here’s the smallest action that will move the needle: take your top 3 most-trafficked blog posts, run them through this 15-step checklist, and fix whatever’s broken. Don’t write a new post first. Don’t redesign your homepage. Just audit and update those three posts. That single afternoon of work will outperform a month of writing new content for most bloggers I know.
On-page SEO isn’t glamorous, and it’s not a one-time project. It’s a quality control system you run every time you publish, and a habit you build until it becomes invisible. Get it consistent, and the compounding starts taking care of itself.

